How to Raise Day Old Guinea Fowl Keets in a Brooder
Guinea fowl are easily alarmed and when they sound a warning out to their flock, they sound like a rusty trampoline spring with the volume turned up to eleven. So, it’s fair to ask what was I was thinking when I bought not four, but forty of these birds.
The tick population on our farm has been a little out of control this year, partially because of the unusually mild winter that we had. Between the dog and I, I’ve been finding a tick every couple of days this year. That had to end. Guinea fowl are an excellent way of controlling the tick population on our land. To keep the ticks at bay, I decided to deploy an army of guinea fowl to go out on tick patrol around the farm.
With a nagging sensation that something was still crawling on me after the last tick that I pulled off of my leg, I jumped onto the Google machine and typed in “guinea fowl for sale Hudson Valley”. Sure enough, a farm just a short drive north of ours had a few for sale. As far as impulse purchases go, forty guinea fowl is one of the stranger decisions I’ve made.

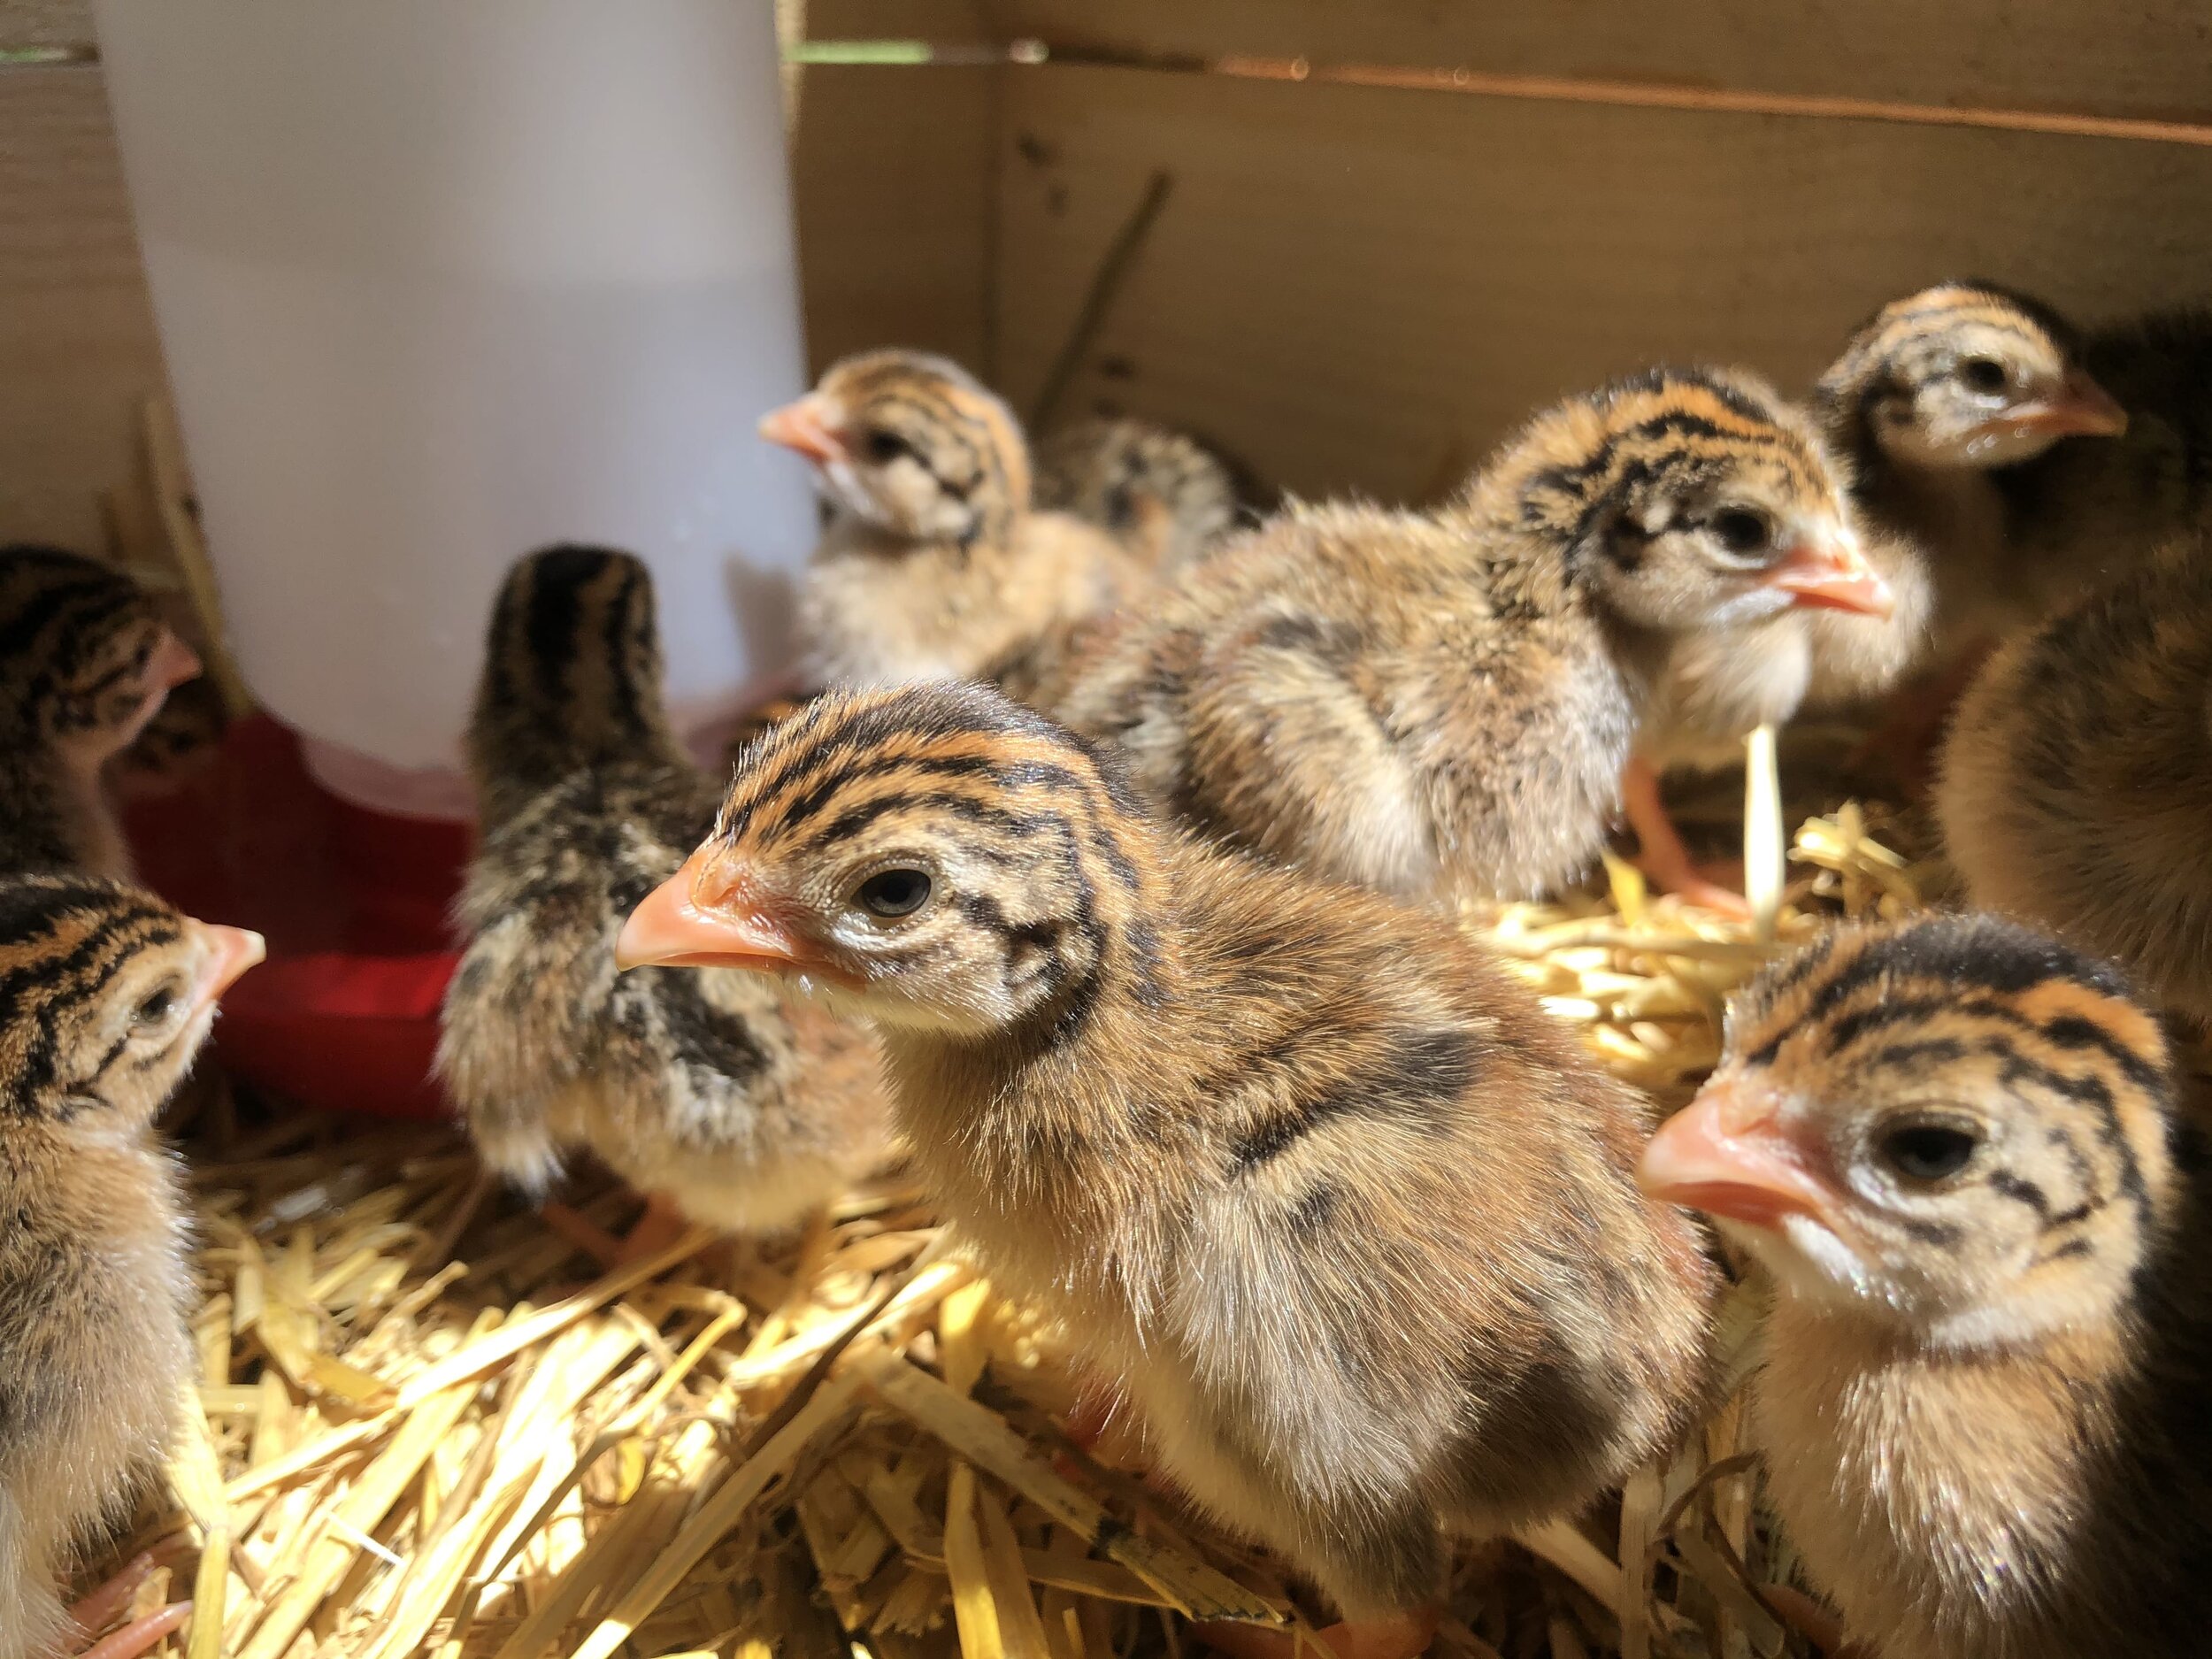
Just a few weeks later, I received an email telling me that my day old keets were ready to be picked up. A “keet” is the term used to call a young guinea fowl. These keets were just day old, meaning they were born yesterday. To keep these little birds alive, they needed to spend the next three weeks in a brooder.
Wait, wait, wait. A brooder?
A brooder is basically just a box. A bird is brooding when they sit on their eggs or young to keep them safe and warm. In this case, I’ll be doing that instead of the mother bird. Or, well, my box will be doing this.
What do I need in my guinea fowl brooder?
You need just three things to brood your guinea fowl keets: food, water, and shelter.
Food
Your guinea fowl will one day be foraging the fields for every tick they can eat, but you’ll need to start them on a high protein game bird starter feed. Most agricultural supply stores will carry something like this. It’s important to start them on a high protein (24% or greater) content feed. It’s also important to buy starter feed, which will come in a much smaller pellet size that the young birds will be able to eat. My forty guinea fowl ate about 50lbs of feed in three weeks, so each bird ate a little over 1lb of food in the first three weeks.

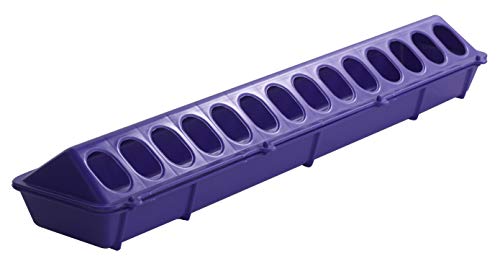
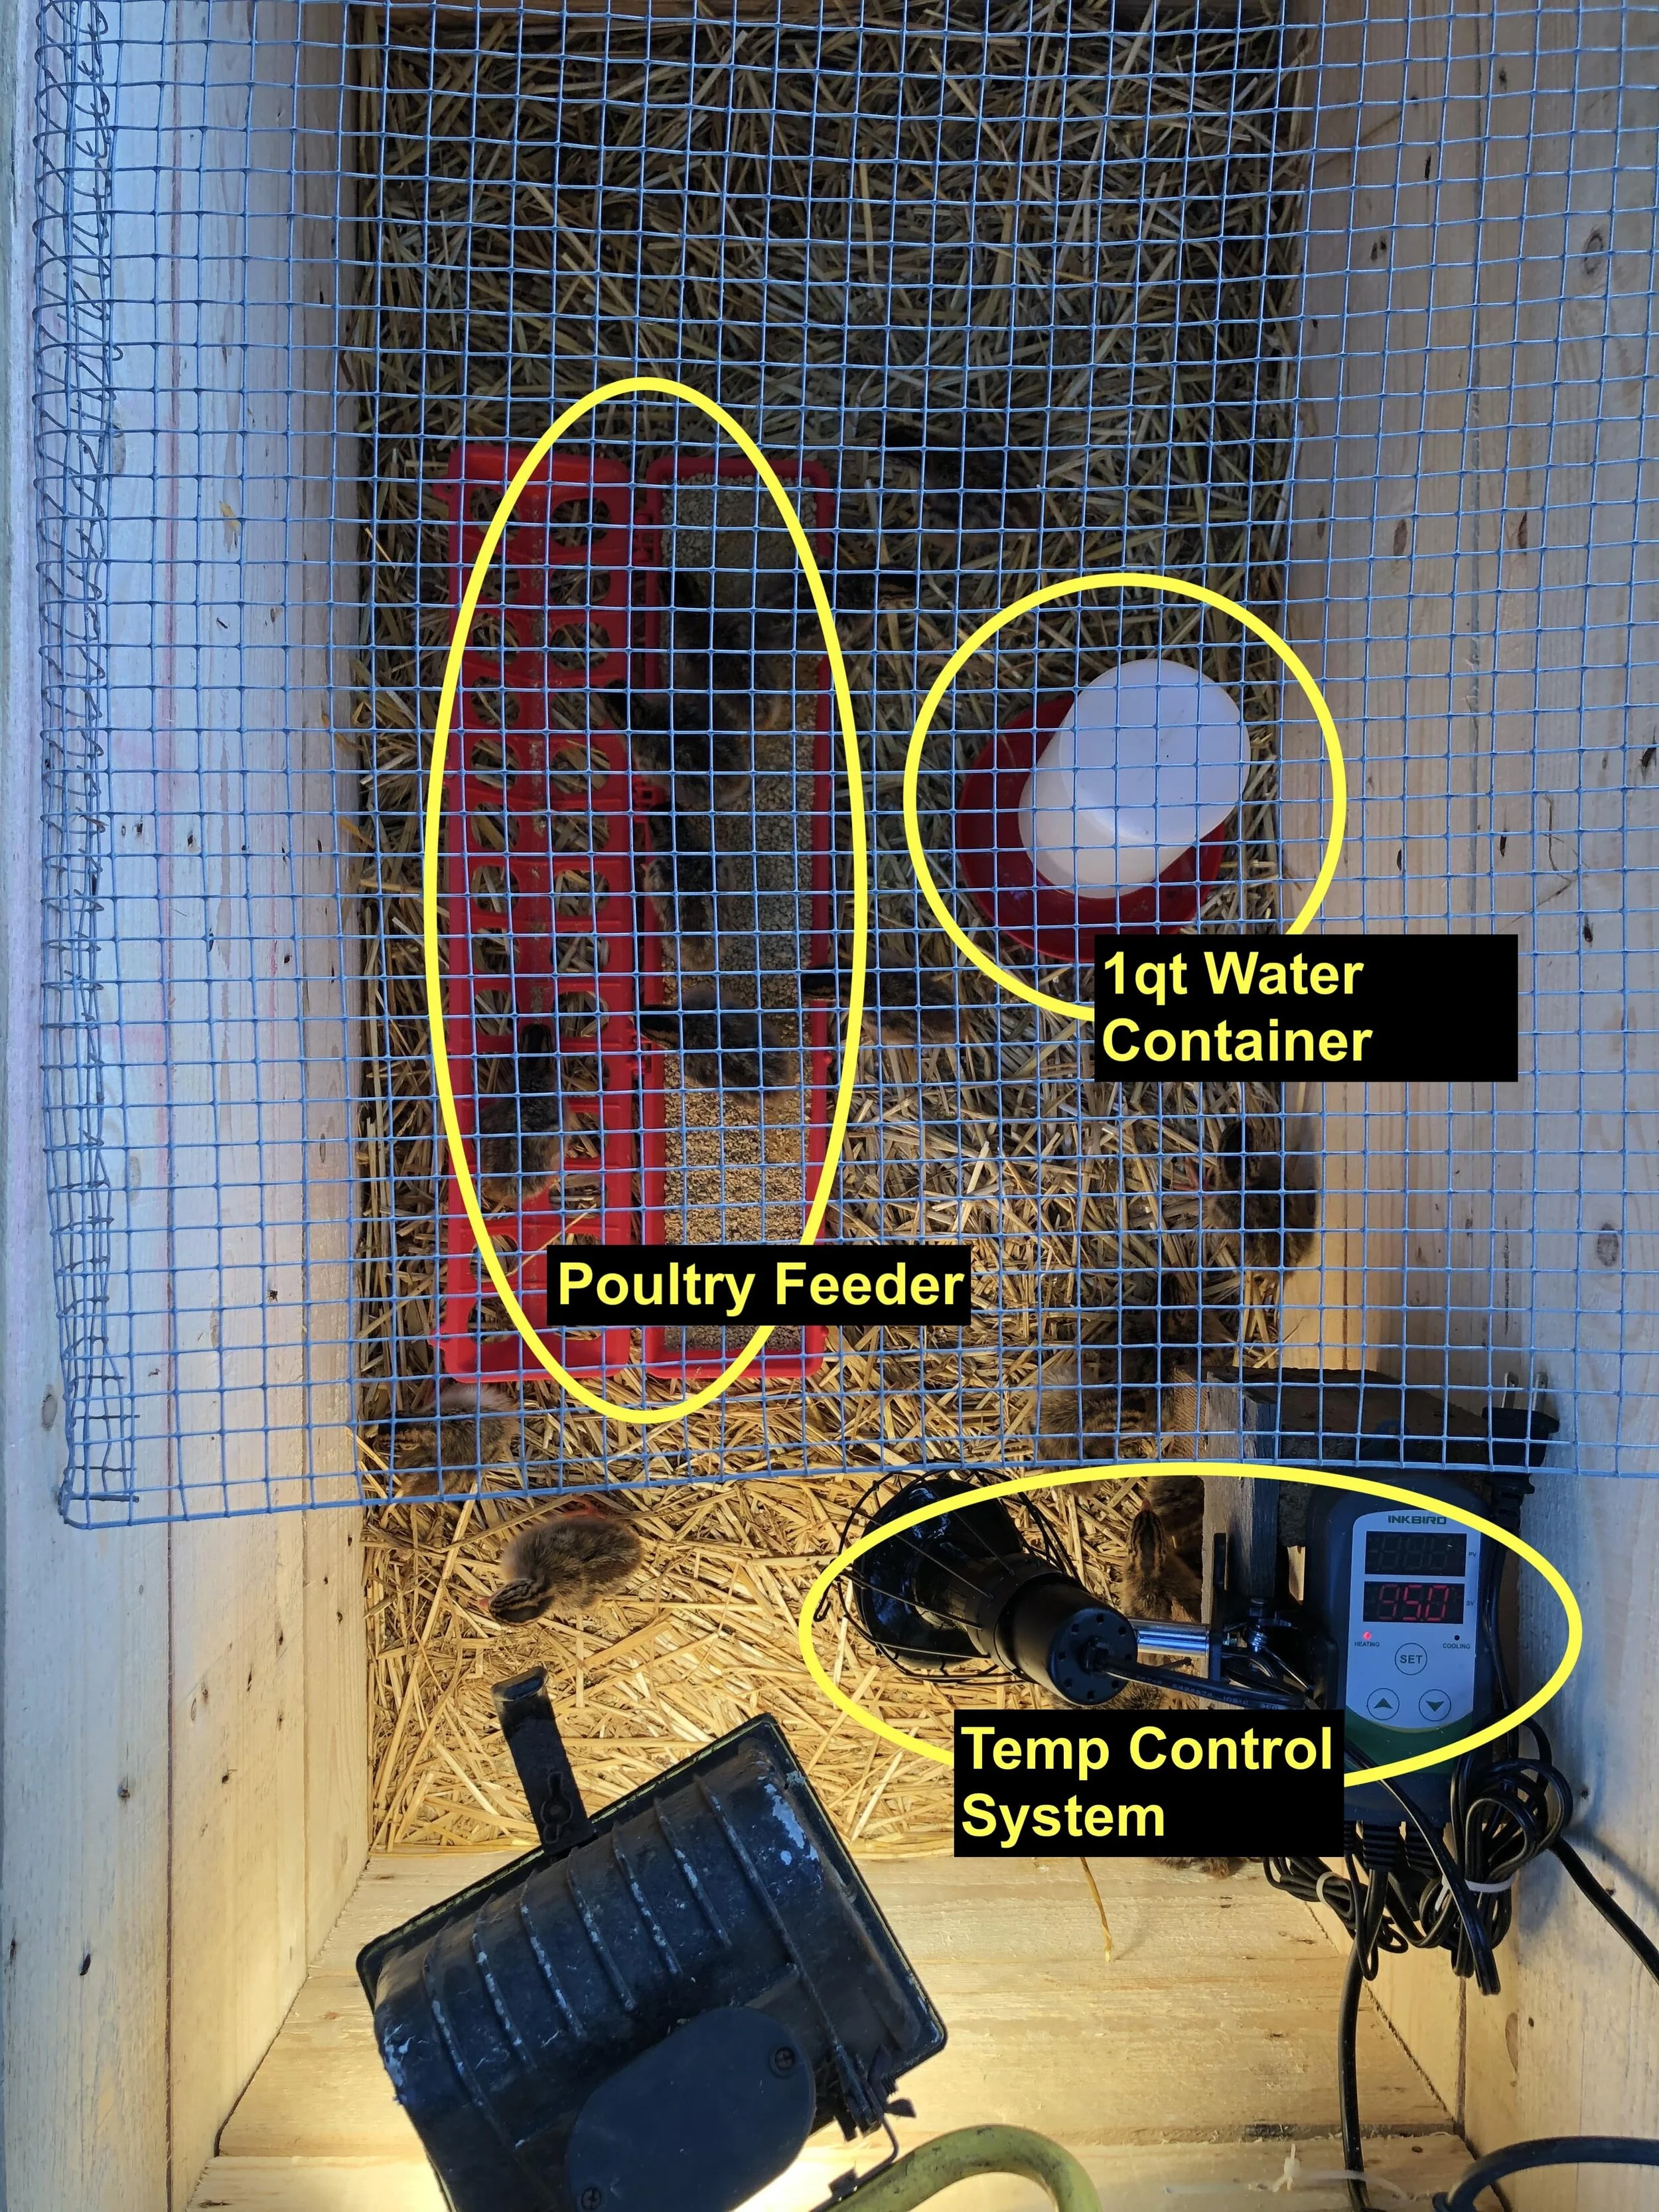
You’ll also need to buy a poultry feeder. These trays hold three or four cups of food. For the first few days, feed the keets with the tray lid open. In just a few days, they’ll be big enough that you can close the tray lid and let them feed through the holes instead. To help the birds grow big and strong, keep the tray filled with food at all times.
Water
Rule number 1 of raising guinea fowl: do not let them run out of water. Get yourself a poultry water container and make sure it is filled at all times.
I started my birds out with a quart-sized water container, but this quickly became a chore. The forty birds would go through several quarts of water per day. The larger the container that you buy, the fewer times you’ll have to fill it. The price difference between the gallon size and the quart size is well worth the money.
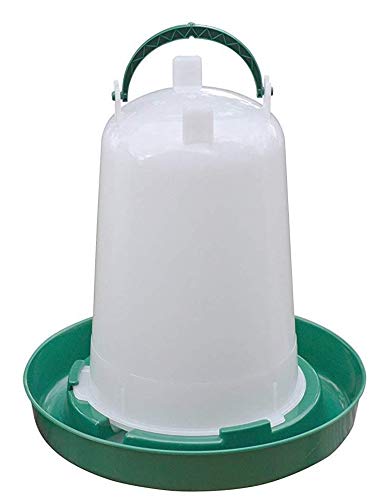
When you do refill the water container, make sure you clean it first. The birds don’t really seem to designate a bathroom and a dining room in their brooder, so you’ll be cleaning a lot of poop. To keep the water clean, set the water container up on a brick or a small block of wood to prevent the birds from walking through it.
Shelter
You’ll need a good sized box and a few other components. Our farm has accumulated so much stuff over the past eighty years, and I have a love/hate relationship with this clutter. It worked out in my favor this time: I found an old wood shipping crate in the back of the south shed. The crate is about 18” wide, 36” long, and 24” deep. This was a little cramped for my forty keets, but it seemed to work for the first two weeks. I did have to introduce the birds to a larger space in the third week to give them a little more space to roam.
Once you find a box, fill the bottom with some straw. Don’t use wood chips or small shavings that they may try to eat.
The most important piece of the shelter puzzle is keeping the box at the right temperature. Remember, in a natural world, guinea keets would be kept warm by their mother. Your brooder needs to be just as warm and welcoming.
For the first week, the keets need to be kept at a constant 95 degrees Fahrenheit. Each week after the first week, you should lower the temperature by five additional degrees. So, the brooder should be 90 degrees in the second week, 85 degrees in the third week, and so on until the brooder reaches ambient temperature.
A common way to maintain temperature is to use a normal incandescent lightbulb and a thermometer. Lower the club into the brooder to raise the temperature and raise the bulb to lower the temperature. Keep an eye on your birds: if they’re huddled together, they’re cold. If they’re laying low or scattered in the corners away from your heat source, they’re too warm. This manual lightbulb and thermometer method works, but I always prefer solutions that require less maintenance.
I found a thermocouple and controller assembly on Amazon that removed all of the stress of maintaining the right temperature. It sounds fancy, but it’s rather simple.

The thermocouple is just an electronic thermometer. Position this little metal sensor roughly in the middle of your brooder. Follow the directions provided in the kit to set your system’s target temperature to 95 degrees (for the first week).
This particular system had a heating outlet and a cooling outlet. The controller basically acts as a switch that alternates between providing power to the heating outlet and the cooling outlet. The thermocouple will tell the controller the current temperature in the brooder. If the brooder is colder than your target temperature, the controller will turn on the heating outlet. If it’s too warm, the controller will turn off the heating outlet and turn on the cooling outlet.
Plug your heating bulb into the heating outlet. If you’d like, you may plug a fan (or some other cooling system) into the cooling outlet. The temperature here in New York never gets too far above 95 degrees, so I just left the cooling outlet empty.
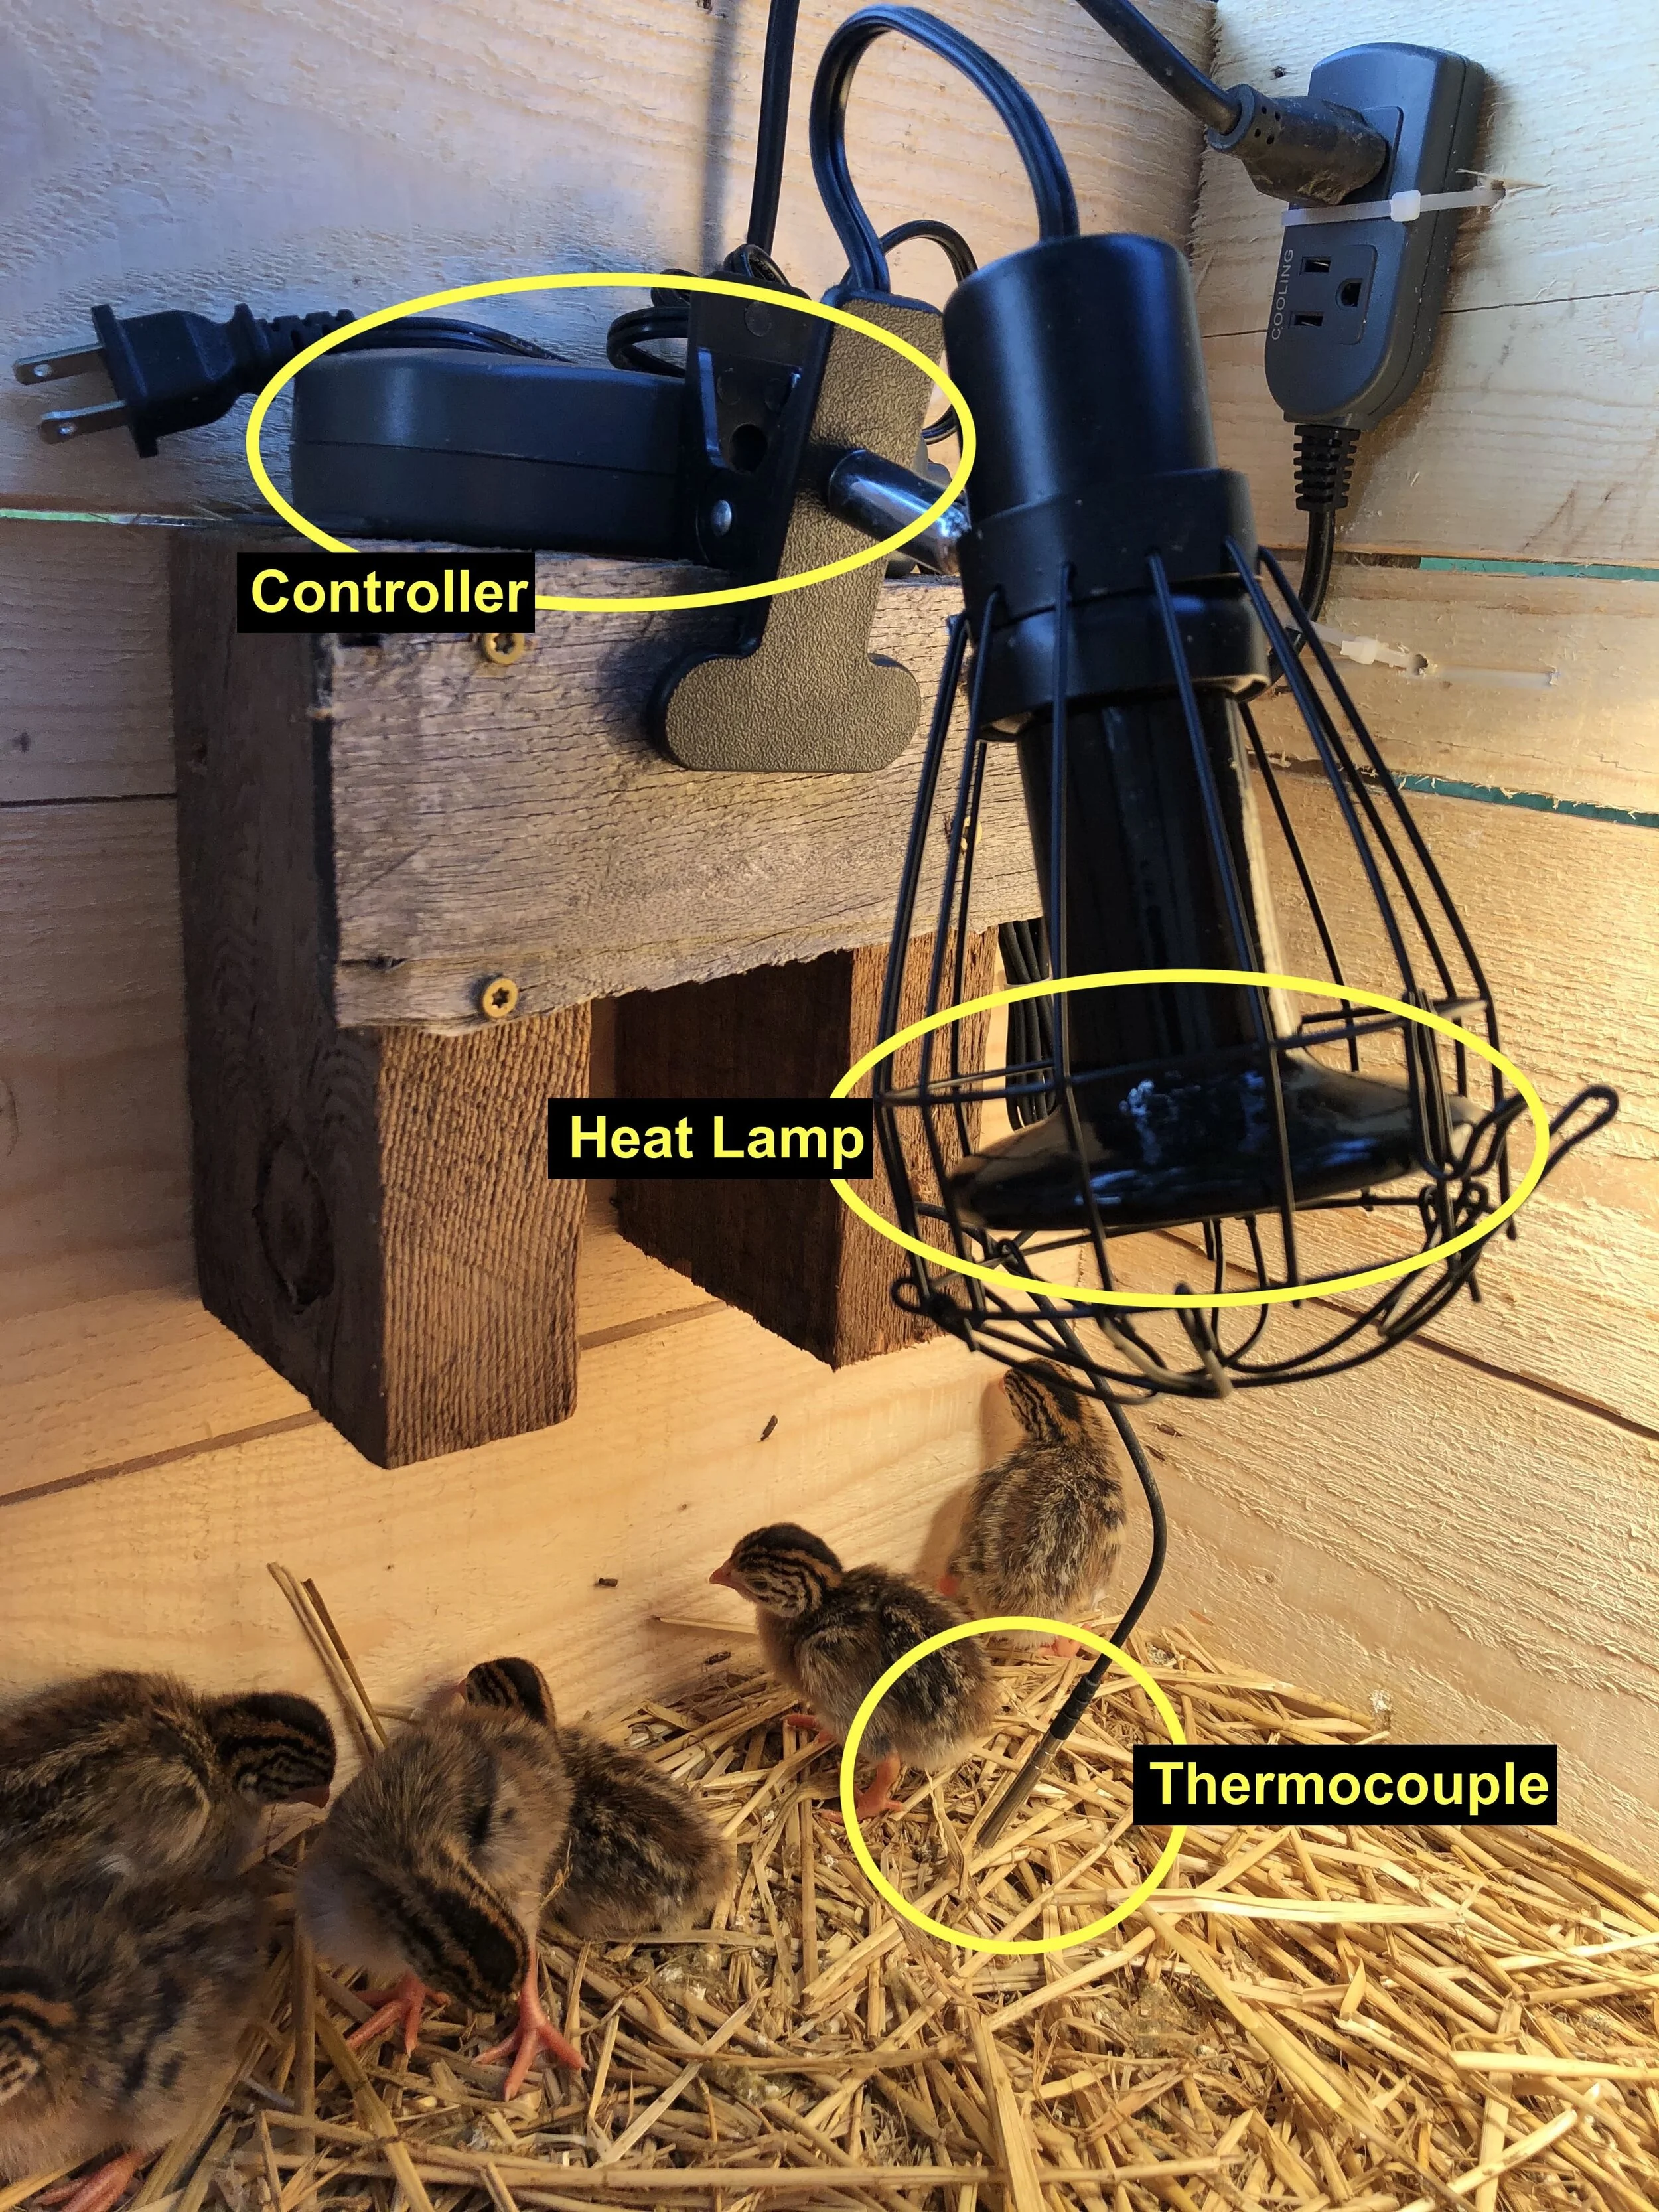
I also chose to upgrade from an incandescent bulb to a ceramic heat bulb. These bulbs throw a little more heat and they don’t light up, so you’ll be able to keep the birds warm without lighting the brooder at night. I bought 100W ceramic bulbs. With only one of these bulbs, the system had trouble keeping my box warm enough. More wattage means more heat, so I needed to add a second bulb. I plugged a power strip into my heating outlet, and then plugged two lightbulbs into the power strip. This kept my birds nice and warm, and all I had to do was adjust the target temperature on the controller once a week.

The keets should stay in your brooder for three weeks. After the third week, you can move them into a coop. I’ve written another blog post about introducing the birds to their coop and training them to return after a day of hunting ticks.
One last thing: bird brooders are notorious for starting fires. The heat lamp and straw is a bad combination. Please try to keep some distance between your heat lamp and the floor of your box. If you choose to keep your box outside and a safe distance from your home or barn, make sure to add a breathable lid to keep the birds safe from predators.
Thanks for reading! If you have any questions, please don’t hesitate to contact us.